Sliding gates are often preferred to boost the safety and appearance of both commercial and residential buildings. If you plan to either replace your gate or install a new one, it is important to learn how to do so properly so the gate works well and doesn’t break easily.
The instructions in this guide will help you from the start to the finish, even if you experience any troubles. The article outlines the key points related to both manual and automatic installation of sliding gates, as well as the cost factors you need to consider.
What is a Sliding Gate?
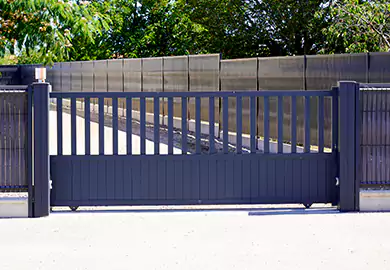
The sliding gate is a type of gate that moves horizontally across a track, ending up on the side of the driveway or entrance. The style is often chosen since it utilizes space well and users find it simple to use. Since sliding gates do not need extra room, they are best suited for places that have space limits in the driveway.
Why Choose a Sliding Gate?
Sliding gates are popular for:
- Space-saving design (no swing clearance needed)
- Enhanced security with automatic sliding gate installation
- Smooth operation with sliding gate rollers installation
- Durability with proper sliding gate track installation
- Low maintenance when installed properly
- Customizable for various sliding gate fence installation styles
Sliding Gate Installation Tools Needed
Before starting your DIY sliding gate installation, ensure you have the following sliding gate installation tools:
| Tool | Purpose |
|---|---|
| Drill and drill bits | For mounting hardware and posts |
| Level | To ensure gate alignment |
| Tape measure | For accurate measurements |
| Wrenches and screwdrivers | Hardware tightening |
| Concrete mixer or shovel | For setting gate posts |
| Welding machine (optional) | For metal gate reinforcement |
| Safety gloves and goggles | Personal protection |
Step-by-Step Guide to Installing a Sliding Gate
Step 1: Measure and Plan the Gate Layout
- Determine the sliding gate size based on your driveway or entrance width.
- Make sure there is enough space for the gate to open without being obstructed.
- Put markers on the sliding gate track and gate post locations.
Pro Tip: A standard sliding gate requires at least 1.5 times the gate width in clearance for smooth operation.
Step 2: Install the Gate Posts
- Each gate post should be placed after digging the hole to a depth of at least 2 feet for stability.
- Put each post in the hole and level it with a spirit level to create a straight line.
- Cover all the holes with concrete mix and leave them to dry for a day or two.
Step 3: Lay the Sliding Gate Track
- Place the sliding gate track so that it is side by side with the fence or wall.
- Ensure the track is stable by bolting or welding it in place (as required by the design).
- Make sure the track is flat so the gates do not drift off-center.
Common Mistake: The sliding gate may jam or wear out too soon if the track is unbalanced.
Step 4: Attach the Gate Rollers
- Attach the sliding gate rollers to the gate's bottom.
- Make sure they line up perfectly with the track.
- Slide the gate manually to check the movement.
Maintenance Tip: Ensure the rollers are properly greased by applying a lubricating agent from time to time.
Step 5: Secure the Gate and Add Stopper
- After sliding the gate onto the track, make sure it moves smoothly.
- To avoid oversliding, install a stopper at the track's conclusion.
- If the gate drags or wobbles, adjust the rollers.
Step 6: Install a Sliding Gate Motor (Optional)
For automated sliding gates, follow these steps:
- Mount the sliding gate motor installation as per the manufacturer’s instructions.
- Connect the motor to the gate and power source.
- Test the automation with a remote or keypad.
Safety Note: Make sure all electrical connections are handled by a qualified expert.
Step 7: Final Adjustments and Testing
Check the gate's motion manually or with a motor.
Set up the sliding gate opener, track, and rollers for silent, seamless operation.
Sliding Gate Hardware Installation Details
The gate will perform well and last longer if the hardware is set up properly. This includes:
- Gate frame: The most important part of the gate
- Sliding gate track installation: The base on which the sliding gate track is mounted must be strong and perfectly aligned.
- Sliding gate rollers installation: When setting up sliding gate rollers, use first-class rollers for easy movements and long-term use.
- Sliding gate motor installation: Set up the motor above the gate’s pivot area to ensure it delivers maximum power.
- Sliding gate opener setup: Program the remotes or keypads as described in the manual for the sliding gate opener.
- Gate stops and hardware: You should also install gates and locks for complete safety.
If you wish for directions, a sliding gate installation video or manual can help a lot.
Automatic Sliding Gate Installation
When installing an automatic sliding gate, care needs to be taken because it is sensitive to many factors.
- Get a sliding gate motor that is suitable for your gate’s size and weight.
- Connect the motor to the required source of power by obeying the local laws.
- Set up programmable sensors that will avoid accidents.
- Make sure the devices are properly synchronized with your existing home security systems, if they have any.
A range of prices for installing an automatic sliding gate depends on the motor, the size of the gate and any additional features involved.
Sliding Gate Installation Troubleshooting
| Problem | Possible Cause | Solution |
|---|---|---|
| The gate won’t slide smoothly | Damaged rollers or misaligned track | Replace the rollers and realign the track. |
| Motor not working | Motor failure or electrical problems | Verify the wiring, reset the motor, or replace it. |
| The gate stops suddenly | Blockage or sensor malfunction | Remove any obstructions and adjust the sensors. |
| Noise during operation | Absence of lubrication | Lubricate the track and rollers. |
Sliding Gate Installation Cost
A sliding gate's installation cost depends on a number of factors including
- The gate's size and the materials used.
- If the gate is operated by a remote control or a key
- It's not always simple to set up a sliding gate motor.
- The fee for hiring professionals or choosing DIY (do-it-yourself) installation
Most people save on labor with DIY, but professional installers are more expensive and ensure both quality and a warranty.
| Installation Type | Approximate Cost Range |
|---|---|
| DIY sliding gate installation | $500 - $1500 |
| Professional sliding gate installation services | $1500 - $5000+ |
| Sliding gate frame | $800 - $1500 |
| Sliding gate hardware parts | $200 - $500 |
| Sliding gate motor installation | $300 - $700 |
| Automatic sliding gate installation cost | Additional $800 - $2500 |
| Total automatic sliding gate installation cost | $1800 - $4000+ |
Tip: DIY sliding gate installation can reduce costs, but requires skill and proper tools.
DIY vs. Professional Sliding Gate Installation
- DIY saves money but requires precision (follow a DIY sliding gate installation guide).
- Professionals ensure proper sliding gate system installation with warranties.
Search for "sliding gate installation near me" to compare sliding gate installation professionals.
Conclusion
Proper equipment, a plan and useful instructions can make the installation of a sliding gate process straightforward. Whether opting for sliding gate DIY installation or hiring experts, no matter your preference, taking the time to learn about installing the motor and other parts of the gate hardware is necessary. Be sure to always use recommended safety tips as you install a sliding gate.
Get in touch with companies providing sliding gate installation services near you to make certain your installation is reliable and safe over the years.